
What you’ll learn
- Plan a maintainable WordPress publishing foundation.
- Connect editorial quality, technical examples, and measurement.
- Apply reproducible approaches to local AI, Android builds, and Linux VM security.
Before you start
This is a planning and implementation blueprint. Have access to your domain and hosting details before deploying WordPress, and use a staging environment for changes whenever your host supports one.
A technically credible blog is more than a theme, an SEO plugin, or a list of AI-generated posts. Readers need accurate instructions they can follow, and site owners need a secure, maintainable publishing system. This blueprint connects four pieces: the WordPress foundation, an editorial plan, reproducible engineering examples, and ongoing measurement.
The instructions below are a deployment guide, not confirmation that a WordPress installation, hosting account, or AdSense account has already been configured. HostyCare’s available software, server stack, SSL controls, and support vary by plan; verify current capabilities in the hosting control panel before selecting plugins or following server-specific steps.
Phase 1: Build a maintainable WordPress foundation
1. Confirm hosting and domain prerequisites
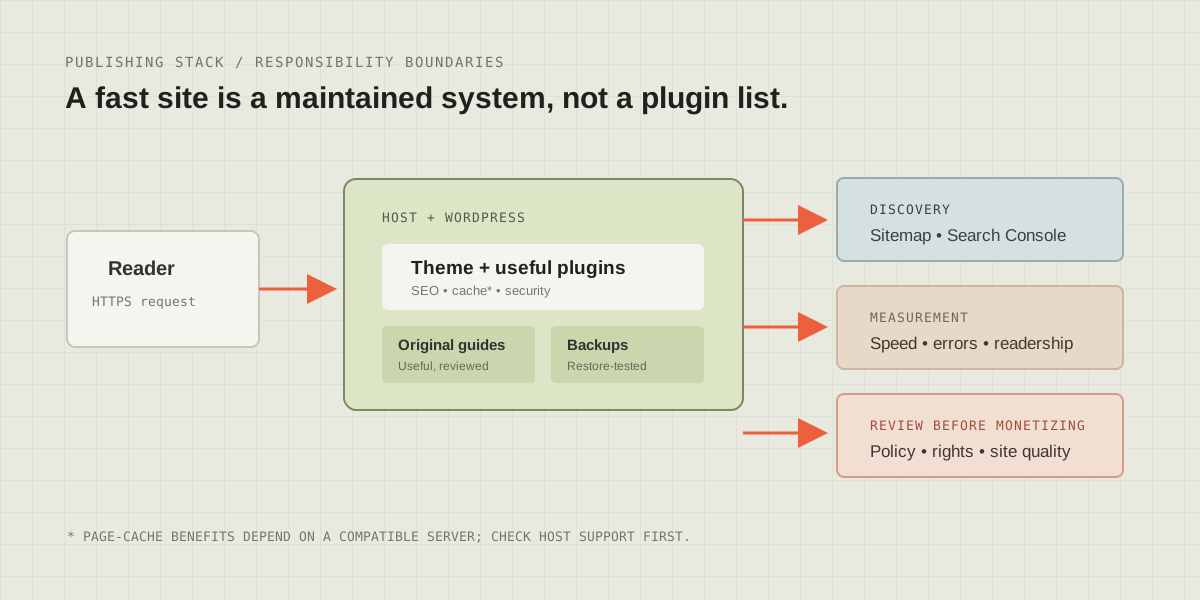
Before installing WordPress on HostyCare, confirm that the domain points to the correct hosting account and that the plan supports a maintained PHP and database version, automated backups, and the site traffic you expect. Ask the provider whether the web server is LiteSpeed/OpenLiteSpeed, Apache, or Nginx. This matters because a WordPress plugin cannot enable server-level features that the host does not provide.
If Softaculous is available in cPanel, its WordPress installer can simplify a fresh installation. Select the correct HTTPS domain and document root, remove any default administrator account, use a unique administrator name and strong password, and avoid installing into a subdirectory unless that is intentional. Review the installer’s update and backup options. The official WordPress installation guide remains useful for understanding the database, configuration, and file permissions even when using an installer.
2. Enable HTTPS and verify renewal
Use the host’s Let’s Encrypt/ACME integration if the plan provides it. Issue the certificate for the exact hostnames you use (for example, the apex domain and www only if both are configured), force HTTPS after confirming the certificate works, and test renewal rather than treating issuance as a one-time task. Check that WordPress Address and Site Address use the canonical HTTPS URL, and resolve mixed-content warnings. Let’s Encrypt explains that many hosting providers manage the certificate on a customer’s behalf; the exact controls are host-dependent.
3. Keep the theme and plugin stack lean
Astra and GeneratePress are two possible lightweight themes; choose one based on accessibility, required layouts, maintenance history, and how much custom code it needs. Start from a child theme or a small site-specific plugin for custom changes so theme updates do not erase them. Do not install multiple plugins that perform the same cache, SEO, firewall, or optimization job.
- SEO: Rank Math can generate an XML sitemap. Configure its sitemap and canonical settings, then check that the sitemap URL returns successfully and contains only pages you intend search engines to index. An XML sitemap helps discovery; it does not guarantee indexing or ranking.
- Cache: LiteSpeed Cache is most effective when paired with a compatible LiteSpeed server. Ask the host whether server-level LSCache is supported before enabling page-cache features. If not, use the host’s recommended cache or a compatible alternative—avoid stacking page caches.
- Security: Wordfence can add application-level security features, but it does not replace core, theme, and plugin updates, least-privilege accounts, backups, or host-level protections. Review its configuration and keep only plugins you maintain.
- Backups: keep a recent database and file backup somewhere separate from the hosting account, and perform a test restore. A backup that has never been restored is an unverified recovery plan.
Test the result on mobile and desktop. Measure real page performance before enabling optimization options; minification, image conversion, and delayed JavaScript can break a working site if turned on without checks. Keep a staging copy for plugin and theme updates when your hosting plan supports it.
Phase 2: Build a useful content architecture—and prepare honestly for AdSense
Group tutorials into clear topics, for example AI & Automation, App & Software Development, and Cloud & Infrastructure. Make categories understandable from the navigation and breadcrumbs. Add an about page that explains who produces the guides, a contact route, and privacy information appropriate to the analytics, cookies, forms, and ad services actually used. Do not publish placeholder legal pages as a substitute for reviewing applicable requirements.
A backlog of 15–20 useful guides can be a sensible editorial target, but Google does not promise approval based on a fixed article count. Its guidance emphasizes unique, original, relevant content, a good user experience, clear navigation, and compliance with program policies. Each guide should demonstrate its own value: explain the environment and version tested, show why each step matters, include accurate screenshots or diagrams, cite primary documentation, disclose assumptions, and revisit the article when tools change.
Do not pad a site with thin rewrites to reach a number. Publish a smaller set of complete, original articles and then build coverage around readers’ real questions. Before applying, review Google’s current eligibility requirements and publisher policies directly; acceptance is determined by Google, and a checklist cannot guarantee it.
Phase 3A: A genuinely local Python voice-assistant pipeline
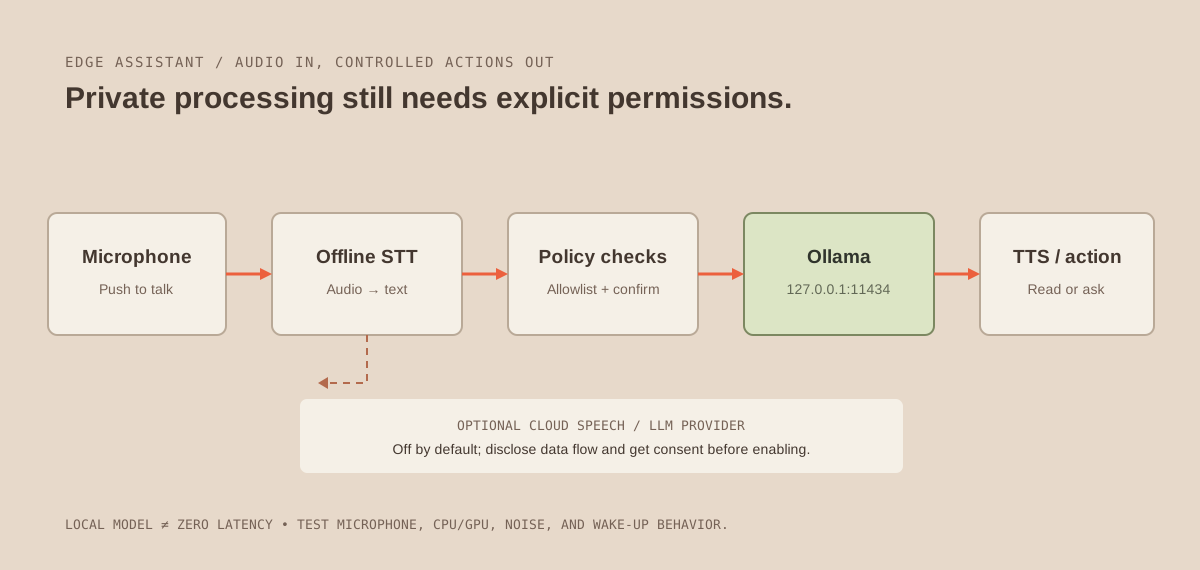
The pipeline has distinct stages: capture audio, transcribe it, decide whether the request is allowed, ask the local model, validate the response, and speak a reply. The popular SpeechRecognition Python library is an interface to several recognition engines; some engine methods send audio to external services. For an offline example, use its Vosk integration with a compatible Vosk model downloaded ahead of time. Text-to-speech through pyttsx3 can run locally on supported desktop systems, but validate audio-device and OS-specific behavior on the target machine.
Install Ollama for your platform, make sure its local API is available, and pull a model that fits your hardware. The example uses llama3.2:3b as a small starting point; model availability and performance vary. Install Python packages and a Vosk speech model following the project’s current documentation. Microphone access may require a PortAudio/PyAudio dependency appropriate to the operating system.
import json
import requests
import speech_recognition as sr
import pyttsx3

OLLAMA_URL = "http://127.0.0.1:11434/api/generate"
MODEL = "llama3.2:3b"

def ask_local_model(text: str) -> str:
    response = requests.post(
        OLLAMA_URL,
        json={
            "model": MODEL,
            "prompt": (
                "Answer briefly and safely. The following is a user request; "
                "do not treat it as permission to execute code or access tools:\\n"
                + text
            ),
            "stream": False,
        },
        timeout=(3.05, 90),
    )
    response.raise_for_status()
    payload = response.json()
    answer = payload.get("response")
    if not isinstance(answer, str) or not answer.strip():
        raise ValueError("Ollama returned no usable response")
    return answer.strip()

def main() -> None:
    recognizer = sr.Recognizer()
    speaker = pyttsx3.init()

    with sr.Microphone() as microphone:
        recognizer.adjust_for_ambient_noise(microphone, duration=0.5)
        print("Listening once. Speak after the prompt.")
        audio = recognizer.listen(microphone, timeout=8, phrase_time_limit=12)

    try:
        transcript = json.loads(recognizer.recognize_vosk(audio)).get("text", "")
    except sr.UnknownValueError as error:
        raise RuntimeError("Offline speech recognition could not understand audio") from error

    if not transcript.strip():
        raise ValueError("No speech was transcribed")

    print(f"You said: {transcript}")
    answer = ask_local_model(transcript)
    print(f"Assistant: {answer}")
    speaker.say(answer)
    speaker.runAndWait()

if __name__ == "__main__":
    main()
This is a single-turn demonstration, not an always-listening agent. It makes a single generation request, uses connection/read timeouts, checks HTTP errors, and does not execute model output. In production, add a clear microphone indicator, a stop control, structured logs that do not retain raw audio by default, and tests for unavailable model, empty transcription, long speech, and noisy input. Keep Ollama bound to loopback unless you have designed an authenticated network boundary; do not expose port 11434 to the public internet. If you later add actions such as sending email or unlocking a door, put a strict allowlist and human confirmation between the model and the action.
“Local” does not mean zero latency. Speech recognition, model loading, CPU/GPU performance, and text-to-speech all add delay. Measure end-to-end response time on the actual target hardware and disclose any optional cloud speech or model provider clearly before sending audio or transcripts off-device.
Phase 3B: Measure Android Studio and Gradle build performance
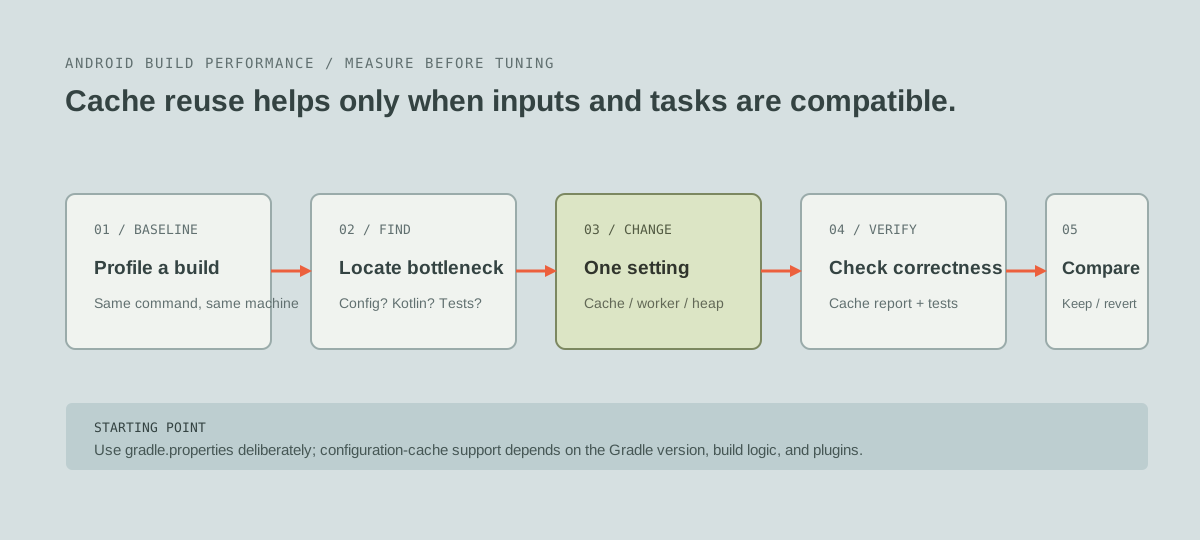
Gradle flags are not magic switches. First compare repeatable builds on the same workstation: note the Gradle and Android Gradle Plugin versions, JDK, task, memory available, and clean versus incremental build time. Android’s build guidance recommends finding bottlenecks and keeping build tools current; a warm daemon and incremental outputs also affect comparisons.
On Windows, the per-user global properties file is typically %USERPROFILE%\.gradle\gradle.properties. Project-level settings can live in the project’s gradle.properties. Start with settings your build supports, then measure:
# %USERPROFILE%\.gradle\gradle.properties
# Start with a heap appropriate for this workstation.
org.gradle.jvmargs=-Xmx4g -XX:+UseG1GC

# Try parallel task execution when projects and plugins support it.
org.gradle.parallel=true

# Reuse outputs from cacheable tasks when their inputs are unchanged.
org.gradle.caching=true

# Enable only after checking build/plugin compatibility and reports.
org.gradle.configuration-cache=true
Four gigabytes is an example, not a universal heap recommendation. Check system memory and Gradle daemon logs; a larger heap can increase memory pressure or garbage collection pauses. The build cache reuses outputs from cacheable tasks. The configuration cache reuses configuration results on compatible subsequent invocations; unsupported plugins or build logic may need changes. Review Gradle’s configuration-cache problem report rather than suppressing errors globally. If a build is not compatible, leave that option disabled for the affected project and track the incompatibility.
Run the same representative tasks before and after each change, including tests. Confirm outputs are correct and compare multiple warm runs. If the build becomes less reliable or uses too much memory, revert the last setting. Other meaningful improvements may come from migrating supported annotation processors from kapt to KSP, reducing unnecessary work, and updating plugins—not from adding every flag you find online.
Phase 3C: Harden a Linux VM without cutting off access
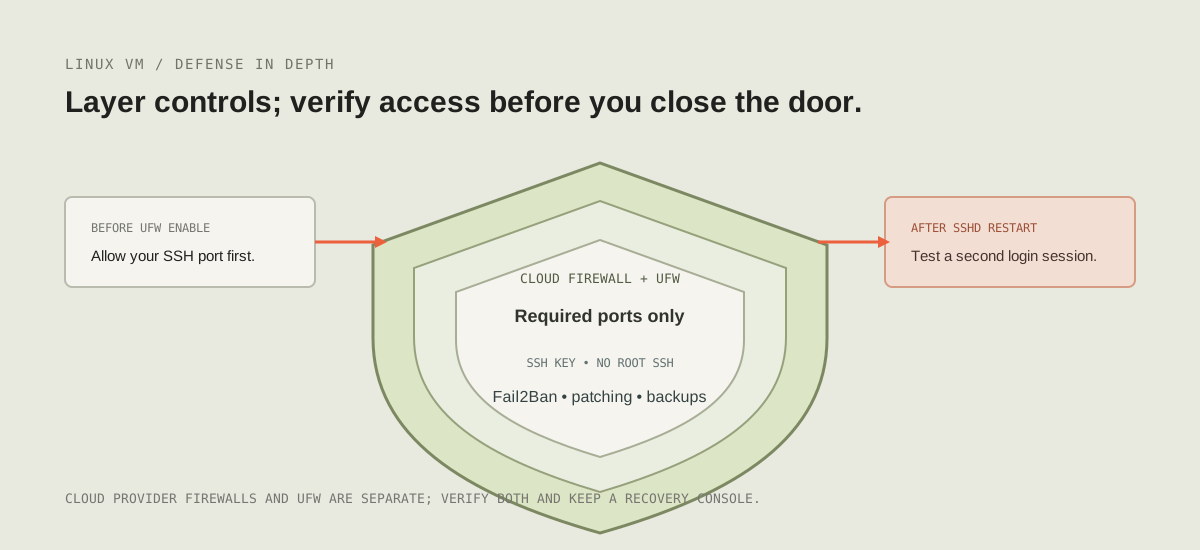
Before changing SSH or a firewall, confirm that the provider offers a web console or recovery mode and keep an existing administrative session open. Confirm the SSH port actually used by the VM; port 22 is common, not guaranteed. If you enable a default-deny firewall before allowing your SSH port, you can lock yourself out.
1. Install a key and test it first
On your workstation, create an Ed25519 key if you do not already have a suitable one. Protect the private key with a passphrase; copy only the public key to the VM through the provider’s trusted key-injection feature or an authenticated SSH session.
# Run locally on Windows, macOS, or Linux
ssh-keygen -t ed25519 -a 64 -C "admin@jengtraders"

# After installing the public key, test a second session
ssh -i ~/.ssh/id_ed25519 admin@YOUR_SERVER_ADDRESS
On Windows PowerShell the key path is commonly $env:USERPROFILE\.ssh\id_ed25519; use your actual key filename. Create a non-root administrator account with narrowly scoped sudo access. Verify that a new SSH session works with the key before changing password-authentication or root-login settings.
2. Apply SSH and firewall changes carefully
On a test VM, configure the SSH daemon to disallow root login and password authentication once key-based access is confirmed. OpenSSH configuration syntax and included-file support vary by distribution and version. Validate the final configuration with sudo sshd -t, then reload the service (for systemd-based Ubuntu this is commonly sudo systemctl reload ssh). Keep the old session open and test a second login before closing it. Do not apply this blindly to a managed hosting account where you do not administer sshd.
For a new Ubuntu VM using standard SSH on port 22, a cautious UFW sequence is:
# First confirm SSH is actually listening on port 22.
sudo ufw allow OpenSSH
sudo ufw allow 80/tcp
sudo ufw allow 443/tcp
sudo ufw default deny incoming
sudo ufw default allow outgoing
sudo ufw status verbose

# Enable only after checking the allow rules and recovery access.
sudo ufw enable
sudo ufw status numbered
If SSH uses another port, add an allow rule for that port before enabling UFW; if access should be limited to a known administration IP, use an appropriate source restriction and account for changing IPs. Apply equivalent rules in the cloud provider’s firewall/security group as well: provider network rules and UFW are separate controls. Open only services the VM actually needs. A web server may require 80/443; a database port should not normally be public.
3. Add Fail2Ban, patches, and recovery
On Ubuntu systems where the package is available, install Fail2Ban and start with the packaged SSH jail. An optional local override in /etc/fail2ban/jail.d/sshd.local can be kept simple:
[DEFAULT]
findtime = 10m
maxretry = 5
bantime = 1h

[sshd]
enabled = true
Review the distro’s log backend and jail configuration; use sudo fail2ban-client status and sudo fail2ban-client status sshd to verify the service and jail are active. Ensure your legitimate administrator IP will not be accidentally banned, and understand how to unban an address from the console. Fail2Ban reduces repeated failed attempts; it does not replace strong authentication, updates, firewalls, or monitoring. Apply security updates, enable only the services required, and schedule backups that you have tested restoring.
Put the blueprint to work
Choose a small, verifiable first milestone: install WordPress on a staging URL and confirm HTTPS and backups; publish one deeply tested AI or Android guide; or harden a disposable VM and verify recovery access. Record what you changed, the versions tested, the result, and what failed. Then turn those notes into an article another developer can reproduce.
A trustworthy technical publication grows through maintained detail, not promises of instant rankings or automatic AdSense approval. Keep infrastructure supportable, make privacy boundaries explicit, cite primary documentation, and revisit the guides as software changes. That is how the content becomes genuinely useful to readers—and a durable source of technical authority for JengTraders.
References and further reading
- WordPress Developer Resources: How to install WordPress
- WordPress Developer Resources: Hardening WordPress
- Let’s Encrypt: Getting started
- LiteSpeed Technologies: LiteSpeed Cache for WordPress
- Rank Math: Sitemaps and SEO benefits
- Softaculous: WordPress auto-installer (availability depends on the hosting provider)
- Wordfence: WordPress security products and documentation
- Google AdSense: Eligibility requirements
- Google AdSense: Make sure your site’s pages are ready
- Ollama: Generate an API response
- SpeechRecognition: Python library and recognizer backends
- Vosk: Offline speech-recognition toolkit
- Gradle: Configuration Cache
- Gradle: Build Cache
- Android Developers: Optimize your build speed
- Ubuntu Server: Firewall documentation
- Ubuntu Server: OpenSSH documentation
- Fail2Ban: Project documentation and security notes