
What you’ll learn
- Measure Android and Gradle builds before changing settings.
- Identify memory, caching, emulator, storage, or antivirus bottlenecks.
- Test one change at a time and keep only improvements you can reproduce.
Before you start
Have a Windows 11 workstation and an Android Studio project you can build. Keep its Gradle wrapper and project files backed up; the first steps only measure performance.
Android Studio, Gradle, and the Android Emulator can put several kinds of pressure on a Windows 11 workstation at once. A slow build may come from an undersized heap, but it can also come from antivirus scanning, a cold dependency cache, a busy disk, incompatible Gradle tasks, an emulator competing for memory, or a project that performs expensive configuration work. Changing random settings can make the machine less stable without addressing the real bottleneck.
This guide uses a measured approach. It is aimed at a typical developer workstation, including a 16 GB RAM configuration, but the right values depend on your project, Android Studio and Gradle versions, CPU, storage, and what else is running. None of the changes guarantees a fixed percentage improvement; benchmark your own builds and keep only changes that help.
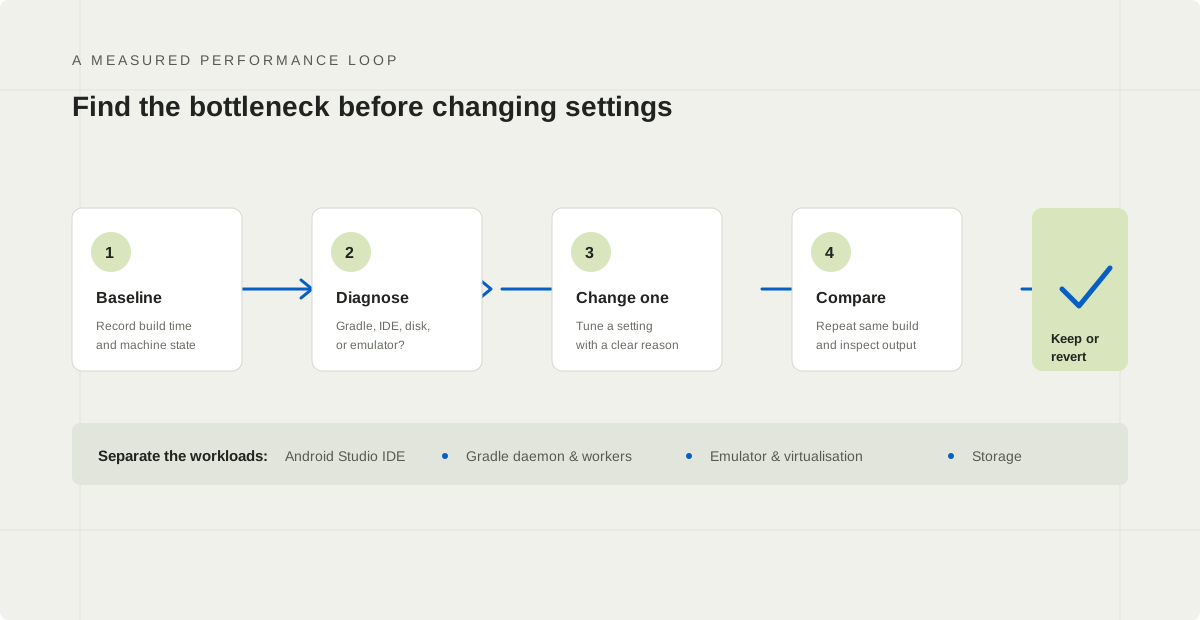
1. Establish a baseline before tuning
Use the same project, build variant, command, and machine state when comparing results. Close unnecessary workloads, connect a laptop to power, and record whether the run is a clean build, an incremental build, or the first build after opening the project. These are different workloads: a warm Gradle daemon and populated caches can make a repeat build much faster even when you changed no settings.
From the project root in PowerShell, capture a baseline build:
.\gradlew.bat assembleDebug --profileUse the task that represents your real workflow—for example, a targeted module task or a test task—rather than blindly timing every project with assembleDebug. The Gradle profile report can help identify time spent in task execution and configuration. For a quick repeatable measurement, run the same command several times and compare the median, not the single fastest run. Note the Gradle and Android Gradle Plugin versions, Java runtime, available RAM, free disk space, and emulator state alongside the time.
Watch Task Manager’s CPU, memory, and disk graphs during the build. If the processor is saturated, more Gradle workers may not help. If memory is nearly full and Windows is paging, assigning a larger heap can make performance worse. If disk activity is pinned, look at storage and background scanning before increasing parallelism.
2. Tune Gradle memory without starving Windows
Gradle’s daemon runs separately from Android Studio’s IDE process. Increasing the Gradle heap does not directly increase the IDE’s own heap, and both processes share physical memory with the emulator, browser, and operating system. On a 16 GB machine, a 4 GB Gradle maximum is a reasonable value to test for a large project—not a universal default. Start lower if the machine is routinely running an emulator or other memory-heavy apps.
For project-specific tuning, edit the project’s gradle.properties file. A conservative starting point to benchmark might be:
# Project root: gradle.properties
org.gradle.jvmargs=-Xmx3g -XX:MaxMetaspaceSize=768m -Dfile.encoding=UTF-8
Try -Xmx4g only if measurements show the daemon needs more heap and Windows still has sufficient headroom. A maximum heap is a ceiling, not a reservation. Avoid adding garbage-collector flags such as -XX:+UseG1GC unless your supported Java runtime and measurements justify them; modern JVM defaults are generally preferable to copying an old tuning recipe. If Gradle reports an out-of-memory error, inspect the failing task and daemon logs before raising the limit again.
Android Studio has its own memory controls, available under Help > Change Memory Settings in supported versions. Adjust the IDE heap separately only when indexing or editor activity is the problem, and restart when prompted. Giving both the IDE and Gradle the maximum possible heap is not a performance plan: it can increase garbage collection pressure elsewhere and push Windows into paging.
3. Enable caching and parallel work deliberately
Gradle build cache can reuse outputs from tasks whose inputs have not changed. Configuration cache can reuse the configured task graph, but a build or plugin that is not compatible may emit warnings or fail when configuration caching is required. Try options one at a time, read the reported problems, and check in shared settings only when your team’s build behaves correctly.
# gradle.properties — enable only after testing your project
org.gradle.caching=true
org.gradle.configuration-cache=true

# Optional: measure before enabling on memory-constrained machines
org.gradle.parallel=true
Parallel execution can reduce wall-clock time when independent tasks exist, but it may also increase CPU and memory use. It is not the same as arbitrarily setting a very high worker count. The build cache helps most when tasks are correctly cacheable and their inputs and outputs are declared; it cannot make every task reusable. Start with a representative build, review compatibility output from your plugins, and confirm that clean builds and incremental builds still produce the expected APK or test results.
To distinguish cache effects from a real improvement, compare a cold or clean build with another cold build, then compare repeated incremental builds separately. Do not delete all Gradle caches as a routine “speed fix”: the next build will have to download dependencies and regenerate outputs.
4. Treat Microsoft Defender exclusions as a security trade-off
Real-time antivirus scanning may contribute to file-heavy build overhead, but an exclusion lowers protection for the excluded path. Do not disable Defender, exclude an entire drive, or copy broad exclusion lists from the web. First verify that scanning is actually a bottleneck, consult your organization’s endpoint-security policy, and use the narrowest exclusion permitted by your administrator. Managed company devices may enforce policy centrally.
If policy allows and a measurement supports it, consider a dedicated, trusted development workspace—not Downloads, shared writable folders, source directories receiving untrusted files, or a whole user profile. Excluding the Android SDK or the entire Gradle cache is not automatically necessary or safe. Malware placed in an excluded directory may receive less real-time scrutiny. Keep Windows, Defender definitions, Android Studio, Gradle, and dependencies updated; restore the exclusion if it produces no clear benefit.
On a personally managed device, Windows Security exposes exclusions under Virus & threat protection > Manage settings > Exclusions. UI wording can change across Windows versions. Prefer an approved, limited folder exclusion over a process or broad-path exclusion, document what you changed, and periodically review it. If this is a managed workstation, ask IT instead of bypassing its controls.
5. Configure emulator acceleration for your Windows setup
The emulator can consume significant RAM and CPU while Gradle is compiling. Check the Android Emulator documentation for the acceleration method supported by your Windows version and Android Emulator release. Windows Hypervisor Platform (WHPX) is commonly used on current Windows configurations; required Windows components, firmware virtualization, and other hypervisors can affect what is available. Do not enable or disable Windows features by guesswork—follow the current Android setup instructions and restart if Windows requests it.
- Confirm firmware virtualization: check Task Manager > Performance > CPU for “Virtualization: Enabled.” If disabled, review the PC manufacturer’s firmware instructions or contact your administrator.
- Check supported hypervisor setup: follow the Android Emulator’s current Windows acceleration page for WHPX and any feature requirements. Avoid mixing incompatible hypervisor configurations.
- Use a suitable device image: choose an image architecture and Android version that match your testing needs. An x86_64 image is usually suitable for accelerated development on supported Intel/AMD Windows PCs; verify the current emulator documentation for your host.
- Keep resource allocation realistic: begin with the AVD defaults. If you change CPU cores or RAM, increase one setting at a time; allocating four cores to an emulator does not make a four-core host faster and can leave less capacity for Gradle.
- Test rendering modes: start with the emulator’s recommended automatic or hardware graphics setting for your installed version. If rendering glitches or driver problems appear, try a supported alternate mode and compare stability and frame performance.
If an emulator is not needed for a build benchmark, close it to get a cleaner result. For routine app development, test a physical device when it is practical; it avoids emulator virtualization overhead, though it does not replace testing screen sizes, API levels, or device configurations your app supports.
6. Keep Android Studio plugins and projects lean
Plugins add features but can also add background work. In Settings > Plugins > Installed, review what is enabled and disable only plugins you know your workflow does not use. The available plugin set depends on the Studio version. Kotlin support is essential for Kotlin projects, and features that look optional may be used by a teammate or a project workflow. Record the change and restart the IDE; re-enable a plugin if a feature or project stops working.
Also reduce avoidable project overhead: close duplicate Studio windows, avoid indexing generated output folders as source, wait for sync to finish before starting repeated benchmarks, and keep adequate free SSD space for the IDE, SDK, Gradle caches, and emulator images. Use Android Studio’s Build Analyzer after a build to inspect slow tasks and recommendations. Apply its suggestions selectively and validate the resulting app.
A practical tuning checklist
- Record repeatable baseline times for clean and incremental builds separately.
- Use Task Manager, Gradle reports, and Build Analyzer to locate the actual bottleneck.
- Change one setting at a time; begin with Gradle heap sized for available physical RAM.
- Test build cache, configuration cache, and parallel execution for compatibility and measurable gains.
- Consider only narrow, policy-approved Defender exclusions after confirming a scanning bottleneck.
- Verify firmware virtualization and follow current Android emulator acceleration instructions.
- Keep AVD resources, Studio plugins, and background workloads appropriate for the workstation.
- Repeat measurements, check app and test outputs, document improvements, and revert changes that do not help.
Claims of universal 40–60% faster builds are not a reliable promise. Improvement depends on the project’s starting point and workload, and some machines may see little difference. Treat build times, system stability, and successful tests as the evidence—not a copied percentage or a long list of toggles.
Make the workstation fit the work
The most reliable way to make Android Studio feel faster is to find the specific resource that is constrained, make a small evidence-based change, and repeat the same workload. On a Windows 11 workstation, Gradle heap settings, caching, antivirus scanning, emulator virtualization, storage, and IDE plugins all deserve attention—but not all at once and not without a rollback path.
Use this guide as a starting point, then keep notes for your team’s Android Studio, Gradle, and Android Gradle Plugin versions. A measured configuration is easier to maintain than a collection of undocumented tweaks.
Official documentation and references
- Android Studio: Configure Android Studio — IDE memory and performance configuration.
- Android Studio: Build Analyzer — analyze build performance.
- Android Emulator: Configure hardware acceleration — Windows hypervisor and emulator acceleration guidance.
- Android Emulator documentation — emulator setup and configuration.
- Gradle User Manual: Improving performance — caching, parallel execution, and performance features.
- Gradle User Manual: Configuration Cache — enablement and compatibility considerations.
- Microsoft Support: Add an exclusion to Windows Security — scope and manage antivirus exclusions.